Work at the Case-Level in Case View
Applies To: Review
In this article
1. Show, Hide, or Rearrange Columns
2. Sort the Columns on the Case Table
3. Navigate Between Records and Document Sets
The Case View tab, also know as the Case Grid or Case Table, presents a table (also called a"grid") of case documents included in the case. The display of the items in the case view is set up by your administrator when they configure Review.
This topic covers work that you do at a case level in the Case View. This includes tasks such as modifying the Case View workspace, comparing two records, and using the Tally function. If you want to change individual records in the Case View, see Work on Records in the Case View/Case Table.
The procedures described in this article explain only some of the many tasks you can complete when working with in the Case View and offer a possible workflow for completing these tasks. This is only an example of a workflow. The tasks can be completed in the order required for your business. The diagram, below, outlines the tasks a user performs when working on individual records.

Once you have opened a case or batch, you can work at the case-level. Click on each procedure to learn more .
 1. Show, Hide, or Rearrange Columns
If a column is sized such that you cannot see all information in the fields of the column.
The columns that appear in the case table may be as follows:
-
A set of fields defined by a coding form
-
A set of user-defined fields
-
All fields in the case (the initial default setting)

 for email files.)
 To show, hide or rearrange columns in the active case table:
-
Adjust the column with, as necessary. To adjust column width:
- Place the mouse pointer
on the column boundary. The cursor changes to
 .
. - Drag the column boundary to the left or right to change the column width as needed.
- Place the mouse pointer
on the column boundary. The cursor changes to
-
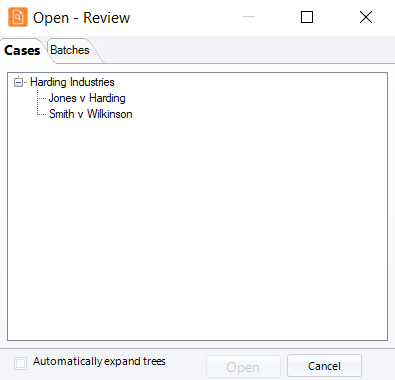
On the Dashboard, click the Review module.

-
Select a Client and Case and click Open.
- To show, hide or re-arrange columns in the list, first select 0: User Defined Layout in the coding form list.
-
Right-click in the Case View or related tab and select Edit Grid Display Fields.
-
In the Grid Display Options dialog box, evaluate the Displayed and Available Fields (hidden fields) lists.
-
To show hidden fields:
-
To select all hidden fields, click Select All in the Available Fields area.
-
To select an individual field, locate it in the Available Fields list and click directly on its check box. The field moves to the Displayed Fields list.
-
Repeat step 3.b for other fields you want to show.
-
-
To hide visible fields:
-
To select all fields, click Select All in the Displayed Fields area, then select one field to display (one field must display).
-
To select an individual field, locate it in the Displayed Fields list and click directly on its check box. The field moves to the Available Fields list.
-
Repeat step 4.b for other fields you want to hide.
-
-
To rearrange the order of fields in the case table:
-
Evaluate the order of fields in the Displayed Fields list.
-
Click the name of a field to be moved (not the check box). The field name highlights, as shown in this example.
-
Drag the selected field name to the needed position (or use the Up/Down buttons). Fields listed top-to-bottom here appear left-to- right in the case table.
-
Repeat these steps to move other fields.
-
-
When finished, click Apply.
-
If you want the fields in Record View to match the fields in your user-defined layout, see Work in Record View.

When Apply is clicked, the changes are applied to the Case View and other tabs in the documents pane. Your changes will remain in effect for current and future working sessions (until you make other changes or select a pre-defined coding form).
2. Sort the Columns on the Case Table
The ability of a field to be sorted is configured by your administrator as part of each field’s definition.
By default, the case table is sorted by the BEGDOC field. It may be sorted differently by default, based on a selected coding form. You can change the sort order as needed for your review. Three sorting methods exist when you are working in the Case View or related tab:
-
Simple sorting based on one column
-
Multi-field sorting - sorting of multiple columns defined by your administrator.
-
Advanced sorting (Search Results or folder tabs only) - sorting of multiple columns that you define.
These procedures apply only to fields defined for sorting. Check with your administrator if you have questions about which fields can be sorted.
Sorting more than one column using either of the latter two methods allows you to have a primary, secondary, and additional subordinate groupings of data.
Sort the Case View/Case TableSorting is specific to each open tab while the tab is open (you can have different sort orders on each open tab).
There are several methods for sorting columns. You can:
- Use Simple Column Sorting
- Sort Multiple Columns Using Multi-Field Column Sort
- Use Advanced Sorting
Click a link below to view a specific sort procedure.
Use Simple Column Sorting
Simple column sorting in Review is easy.
-
On the Dashboard, click the Review module.
-
Select a Client and Case and click Open.
- To sort the case table based on a certain field, right-click in the column to be sorted and select Sort Ascending or Sort Descending from the resulting menu.
- To clear a simple sort, right-click and select Clear Sort. The previous sort order will be restored. Alternatively, you can perform a different sort.
Sort Multiple Columns Using Multi-Field Column Sort
If your administrator has defined multi-field sort indexes, you can select an index to quickly sort the contents of a tab in an order defined by the administrator. To do so:
-
On the Dashboard, click the Review module.
-
Select a Client and Case and click Open.
-
Right-click in the case table and select Multi-Field Sort.
- Select the needed sort index and click OK. If you have any questions about the sorting for a particular index, contact your administrator.
- To clear a multi-field sort, right-click and select Clear Sort. The previous sort order will be restored. Alternatively, you can perform a different sort.

|
TIP: If the tab contents do not appear correctly after you select a sort index, alert your administrator. He or she may need to rebuild the case indexes. |
Use Advanced Column Sorting
Search results (or a public or private folder) can be sorted on multiple columns that you define as described in the following procedure.
-
Perform the needed search or open a folder.
-
Make sure columns are shown and organized as needed.
-
On the Search Results (or folder) tab, right-click in case table and select Advanced Sort.
-
Field selection: In the left pane of the Advanced Sort dialog box, select one or more fields to be sorted:
-
To select individual fields, double-click each field.
-
To select multiple items, click a field name, then Shift+click or Ctrl+click additional fields to choose a contiguous or non-contiguous set, respectively.
-
-
Field order: The top-to-bottom order of selected fields in the Advanced Sort dialog box represents the order in which data will be sorted. The topmost field will be sorted first, the next field will be sorted second, and so on.
To define the sort order:
-
In the right pane of the Advanced Sort dialog box, click a field to be reordered.
-
Click the up or down arrow buttons until the field is in the desired location.
-
Repeat these steps to reorder other fields.
-
-
Sort order: By default, data will be sorted in ascending order. To change the sort order:
-
In the right pane of the Advanced Sort dialog box, click a field to be changed.
-
Click the arrow. The Sort Order changes.
-
Repeat these steps to change the sort order for other fields.
-
-
When all steps are completed, click OK. The case table will be sorted as you specified.
When all fields have been selected, click the right arrow .
3. Navigate Between Records and Document Sets
To move through all records and see all record content:
-
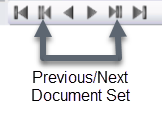
Use the case table navigation bar. To move between pages of a document, document sets, or case documents as a whole.
-
Use the vertical/horizontal scroll bars to view all content. There may be a slight pause as you scroll.
- Use keyboard shortcuts, see Keyboard Shortcuts: Record View.
4. Wrap Text in Grid
All information in a particular field may not be visible, in which case the information is truncated and ends with an ellipsis.
To view field content that is truncated, take any of the following actions:
-
Right-click anywhere in the case table and select Wrap text in grid. All content will display in multiple lines. Row size will be as large as necessary to display all content. (Select this menu item again to limit each row to a single line.)
Tip: If you don’t want to wrap text, point to a field with truncated content to view a tooltip containing the complete content.
-
In the case table, change column size, visibility, and/or order.
-
Make the case table area larger by changing the workspace layout.
-
Use Record View. For more information, see Work in Record View.
5. Go to a Specific Record
To go to a specific record in the case table:
-
Identify the record number or image key for the record of interest. Or, if you have sorted the case table on another column, identify the content of interest.
-
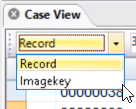
In the Case View or other tab in the documents pane, select Record or Imagekey on the tab’s toolbar. Or, to go to a record based on content of the sorted column, select the field (column heading name). In this example, the user will go to a specific author name.
-
In the corresponding field, enter needed information as described in the following table.
-
Press ENTER. The record corresponding to your entry will become the highlighted record in the Case View or other active tab. (If the value is not found, the entry becomes red and the row selection remains unchanged.)
|
Item |
What to Enter |
Example |
|
Record no. |
The complete number |
953 |
|
Image key |
The beginning of, or complete, image key |
For the image key ABC-0010, enter abc-001. |
|
Sorted field content |
The beginning of, or complete, content |
For the author “Abernathy,” enteror as many characters as needed to go to the needed content. |
6. Compare Two Records
Anyone working in Case View or a related tab can compare the field data of two records. Most fields visible in the case table (as defined by the selected workspace) will be compared. Exceptions include most system fields (such as BEGATTACH, ENDATTACH, EXTRACTEDTEXT, FILEID, etc.).
To compare two records:
-
Identify the two records to be compared. If they are far apart in the case table, you may want to take an action to make them closer together (for example, change the grid size or perform a search that will return both records).
-
In the case table, click a field of one of the records to be compared, then Ctrl+click the same field for the second record.
-
Right-click and select Compare Selected Documents.
-
Review results in the Comparing Documents dialog box. Tips:
-
Scroll to view all fields.
-
Resize the dialog box by dragging a corner of the window.
-
To save the results in a text file, use common select/copy/paste keyboard shortcuts (Ctrl+A, Ctrl+C, Ctrl+V).
-
When finished, click Cancel.
7. Use the Tally Function
Tallying a column displays the total number of instances of a value in sortable fields meeting the conditions described in this topic.
You can use the tally function in the Case View and Search Results tabs. In addition, tally results can be exported or printed.
Anyone who is assigned to a case or batch can tally case data for columns existing in their case.
Data can be tallied for the following fields:
-
Fields defined with the Sort Key or Category flag
-
Numeric fields
-
A field defined as the BEGATTACH type
Fields defined with the Primary Key flag cannot be tallied, because the values for such fields are unique. (For example, the BEGDOC field.)
Contact your administrator if you have any questions about which columns can be tallied.
Tally a Column and Print and Export Tally Data
You can use the Tally function to view data in the case table
To tally a column in the case table:
-
In the Case Viewor related tab, locate the needed column.
-
On the Dashboard, click the Review module.
-
Select a Client and Case and click Open.
-
Right-click in the column and select Tally.
-
Evaluate the results in the Tally tab (by default this tab is in the left slideout pane of the workspace). The total number of unique results is presented at the top of the tab and individual counts for each unique result are displayed in the main area of the tab.
-
Optional: For dates with month, day, and year details, if the needed information is not displayed, click the Options button in the Tally tab, select the desired Date Tally Option, and click OK. Note:
-
Day: All date information is displayed and tallied, as in 2009/12/31.
-
Month: Year and month are displayed and tallied, as in 2009/12.
-
Year: Only the year is displayed and tallied, as in 2009.
-
-
Optional: Sort the content of the Tally tab by clicking the field or Count column heading.
-
If desired, sort the content of the Tally tab by clicking the field or Count column heading.
-
Click
 . Complete the Print dialog
box and click OK. Tally results will be printed in the order in the tab.
. Complete the Print dialog
box and click OK. Tally results will be printed in the order in the tab. - Optional: Export the Tally results as comma delimited data.
- Click
 .
. - In the Save Tally dialog box, navigate to a desired location, enter a file name, and click Save.
- Click
- Optional: Export the Tally results as data with a different delimiter.
-
On the Tally tab, click the Options button.
- Enter the desired character in the Export Delimiter field.
- Click OK.
- Click . In the Save Tally dialog
box, navigate to a desired location, enter a file name, and click
Save.
Note: If the Tally command is not available, the data in the column has not been defined or is not suitable for sorting or tallying. See Privileges and conditions required for information which fields can be tallied.
8. Find Produced Documents
Review provides an easy way to search for a produced document by production image key. This can be useful when you have a production image key and do not know which case document it corresponds to (because the produced documents were renumbered).
To search for produced documents from the case table:
-
For best results, ensure the document details pane is open.
-
In the Case View or related tab, right-click and select Search Production History. The resulting dialog box lists production image keys for all produced documents for the case, using the numbering specified for the production jobs.
-
Enter the production image key of interest or scroll in the list and select it. Use the arrow keys to navigate through the entire list:
-
Click Select. A Search Results tab opens with the record for the case document that corresponds to the production document for which you searched.

|
|
TIP: Type the first letter (or number) of the needed production image key to jump to the set of numbers starting with that letter (or number). |
If the document details pane is open, the produced document you searched for automatically displays in the Production History tab. All production jobs that include the case document are available for selection.
If only some of the pages in the case document were included in the production, then only those pages will be available in the Production History tab.
Version: 2023.8.12
Last Revision: 11/8/2023